Your home’s roof is more than just a protective covering—it’s a major part of your home’s appearance and value. Over time, roof tiles can lose their color and shine due to sun exposure, rain, and general wear. Instead of replacing your roof entirely, painting roof tiles can be an affordable and effective way to restore its look and extend its lifespan.
Whether you have concrete, terracotta, or metal tiles, roof tile painting can dramatically enhance your home’s curb appeal and protect your investment for years to come. In this guide, we’ll explore everything you need to know about painting roof tiles, including benefits, preparation steps, materials, and maintenance tips.
Why Paint Your Roof Tiles?
Painting roof tiles offers both aesthetic and practical advantages. Here are the top reasons homeowners choose this cost-effective upgrade:
1. Improves Curb Appeal
Faded tiles can make even a well-maintained house look dated. Applying a fresh coat of paint instantly revitalizes your home’s exterior, making it look cleaner and more modern. You can even change the color entirely to match new design trends or your home’s updated façade.
2. Extends Roof Life
Paint acts as a protective barrier against the harsh elements—sunlight, rain, wind, and dust. By sealing the surface, it prevents water absorption and reduces the growth of mold and lichen. This helps extend the roof’s lifespan without the need for costly replacements.
3. Enhances Energy Efficiency
Choosing reflective or light-colored roof paints can reduce heat absorption, keeping your home cooler during hot months. This not only increases comfort but also lowers energy bills.
4. Prevents Deterioration
UV rays and moisture can break down the surface of roof tiles over time. A high-quality roof coating minimizes surface erosion, prevents cracking, and reduces the likelihood of leaks.
5. Adds Property Value
A well-painted roof can boost your home’s resale value. Potential buyers are often drawn to homes that appear well cared for and visually appealing.
Choosing the Right Paint for Roof Tiles
Not all paints are suitable for roofing materials. Choosing the right product ensures long-lasting results and protection.
1. Acrylic Roof Paint
This is one of the most popular choices because it offers excellent durability, UV resistance, and water repellence. Acrylic paints are flexible, allowing for natural expansion and contraction of roof tiles.
2. Elastomeric Paint
This type of coating is thicker than acrylic paint and provides a rubber-like seal over tiles. It’s ideal for roofs that experience heavy rain or minor cracks.
3. Heat Reflective Paint
If you live in a hot climate, consider specialized reflective roof coatings. These paints reduce heat absorption and help keep your interior temperatures stable.
4. Oil-Based or Enamel Paints
Although durable, oil-based paints are less common today because they’re harder to apply and may not allow tiles to breathe properly. Acrylic-based coatings are typically preferred for modern applications.
When selecting paint, always ensure it’s specifically formulated for roof surfaces. Look for features such as UV stability, waterproofing, and resistance to mold and mildew.
Preparing Your Roof for Painting
Preparation is the most critical step in ensuring the paint adheres well and lasts for years. Skipping these steps can lead to peeling, flaking, and uneven finishes.
1. Inspection and Repairs
Start by checking the entire roof for damaged or cracked tiles. Replace any broken pieces and repair flashing or ridge caps.
2. Cleaning the Roof
Roof cleaning removes dirt, moss, algae, and debris. Most professionals use high-pressure washing systems to ensure a clean surface. For DIYers, a pressure washer or stiff broom and cleaning solution can also work effectively.
3. Treating Mold and Lichen
If your roof has biological growth, apply a fungicidal wash or anti-mold solution. This prevents regrowth under the new paint layer.
4. Priming the Surface
A primer coat is essential, especially on porous materials like concrete tiles. It ensures better adhesion and an even finish. Some roof paints come with built-in primers, but applying a dedicated primer coat can significantly improve results.
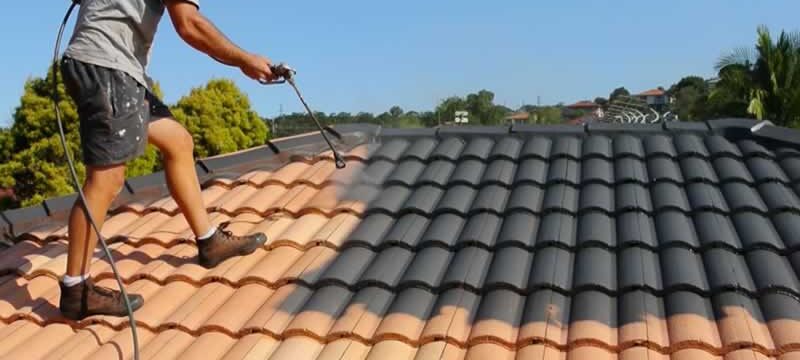
The Painting Process
Once your roof is cleaned, dry, and primed, it’s time to apply the paint. Depending on the roof’s size and complexity, you can either hire professionals or take the DIY route if you have the right tools and experience.
Step 1: Safety First
Before climbing onto the roof, ensure you have the necessary safety gear—non-slip shoes, harnesses, and stable ladders. Avoid working on wet or windy days.
Step 2: Tools and Equipment
- Paint rollers or airless sprayers
- Extension poles
- Roof-safe ladder or scaffolding
- Protective clothing and gloves
Sprayers are the preferred method for even coverage, but rollers can be used for small or detailed areas.
Step 3: Applying the Paint
Apply the first coat evenly, starting from the highest point of the roof and working downward. Allow the first coat to dry fully (usually 2–4 hours) before applying the second. Two coats are generally sufficient for full coverage and protection.
Step 4: Finishing Touches
Inspect the roof for any missed spots or uneven areas and touch them up accordingly. Once dry, the roof should have a consistent, clean, and rejuvenated look.
Professional Roof Painting vs. DIY
While DIY roof painting may seem cost-effective, it involves considerable effort, time, and risk. Professional painters bring experience, safety equipment, and specialized coatings that ensure lasting quality.
Benefits of Hiring Professionals:
- Access to industrial-grade cleaning and painting tools
- Expertise in surface preparation and coating selection
- Safe and efficient completion of work
- Warranties for workmanship and materials
If you choose the DIY route, take time to research techniques and safety protocols to ensure a proper job.
Common Mistakes to Avoid
- Skipping Cleaning: Dirt and moss can prevent paint from adhering properly.
- Using Regular Paint: Only use coatings designed for roofing materials.
- Ignoring Repairs: Painting over damaged tiles will not fix leaks or cracks.
- Poor Timing: Avoid painting during extreme temperatures or high humidity.
Maintenance Tips After Painting
A freshly painted roof can last up to 10–15 years with proper care. Here’s how to keep it looking great:
- Inspect Regularly: Check your roof annually for any signs of wear or fading.
- Clean Gently: Remove debris or leaves that collect in roof valleys and gutters.
- Address Issues Promptly: Repair chips or cracks early to prevent further damage.
- Recoat When Needed: Depending on the paint type and exposure, consider a new coat after a decade for maximum protection.
Environmental and Energy Benefits
Modern roof coatings not only improve aesthetics but also support energy efficiency and sustainability. Reflective paints can lower cooling costs by up to 20% during hot seasons. Many products today are low-VOC (volatile organic compounds), reducing environmental impact and maintaining healthier indoor air quality.
By choosing high-quality materials and proper application, you’re contributing to a more eco-friendly home that stays cooler and lasts longer.
Final Thoughts
Painting roof tiles is one of the most effective ways to rejuvenate your home’s appearance and protect it from the harsh elements. With the right materials, preparation, and technique, you can achieve a roof that not only looks beautiful but also performs better for years to come.
Whether you hire professionals or take the DIY approach, remember that painting roof tiles is both an aesthetic upgrade and a practical investment. A well-painted roof adds charm, durability, and energy efficiency to your property—making it a smart choice for homeowners seeking lasting value and beauty.


